
Design & Technology
Packaging Dieline Generator: How to Create Print-Ready Templates with AI
Cubit Packaging
July 2, 2026
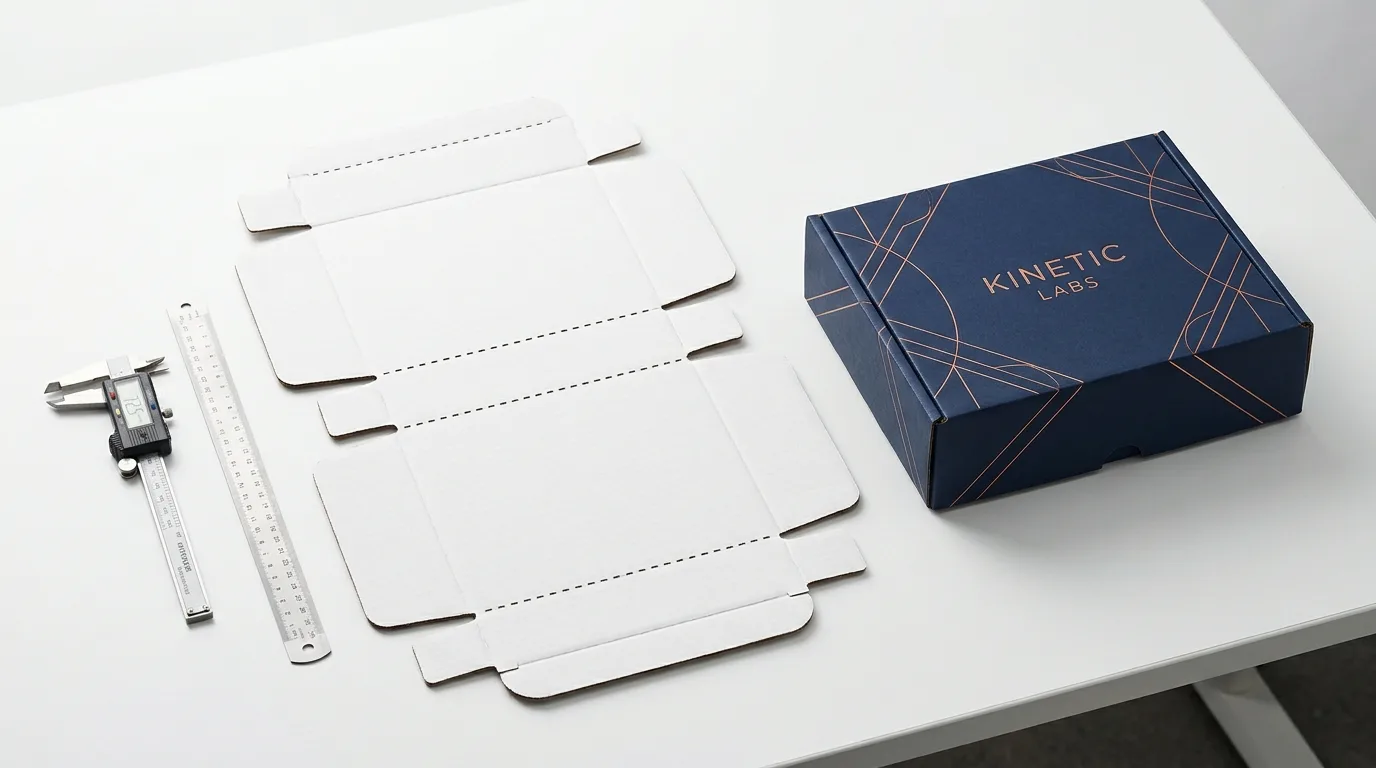
A packaging dieline generator builds the flat, 1:1 scale structural blueprint that commercial printers and die-cutting machines need to cut, score, and fold a custom box. Instead of drawing every panel and flap by hand in CAD software, you enter your inside length, width, and depth or describe your box style to generate a layered template with cut lines, fold creases, glue tabs, and a 3 mm bleed zone. You can download starter templates right away or pair AI artwork drafting with structural review before production.
A packaging dieline is the flattened two-dimensional technical drawing of a three-dimensional package. Every folding carton, corrugated mailer, sleeve, pouch, and die-cut label starts as a flat sheet of paperboard, corrugated board, or film. Before a press prints your artwork or a flatbed die cutter punches the board, the converter needs an exact vector map showing where steel cutting rules slice through the sheet and where rounded creasing rules press fold hinges into the board.
A packaging dieline generator automates the geometry behind that flat layout. When you enter the inside dimensions of a box (Length x Width x Depth), the generator calculates the main body panels, top and bottom tuck flaps, dust flaps, glue tabs, and locking ears in their unfolded positions. Rather than treating every panel as an identical rectangle, a parametric generator offsets flap widths and tuck clearances so the box closes cleanly without bowing at the corners or popping open during transit.
At Cubit Packaging, buyers and designers use two connected paths depending on where they are in a project:
In both workflows, starter templates give you an accurate layout for placing graphics and testing proportions. When you are ready to print, Cubit's structural team confirms the production dieline for your exact board caliper and flute profile with your quote before anything goes to press.
A print-ready packaging dieline separates structural tooling paths from printable CMYK or Pantone artwork so the die lines never print on the finished box. In commercial packaging prepress, the Ghent Workgroup packaging specifications and the ISO 19593-1 standard (known as PDF Processing Steps) define how cutting, creasing, folding, varnishing, and gluing paths sit on dedicated, non-printing vector layers set to overprint.
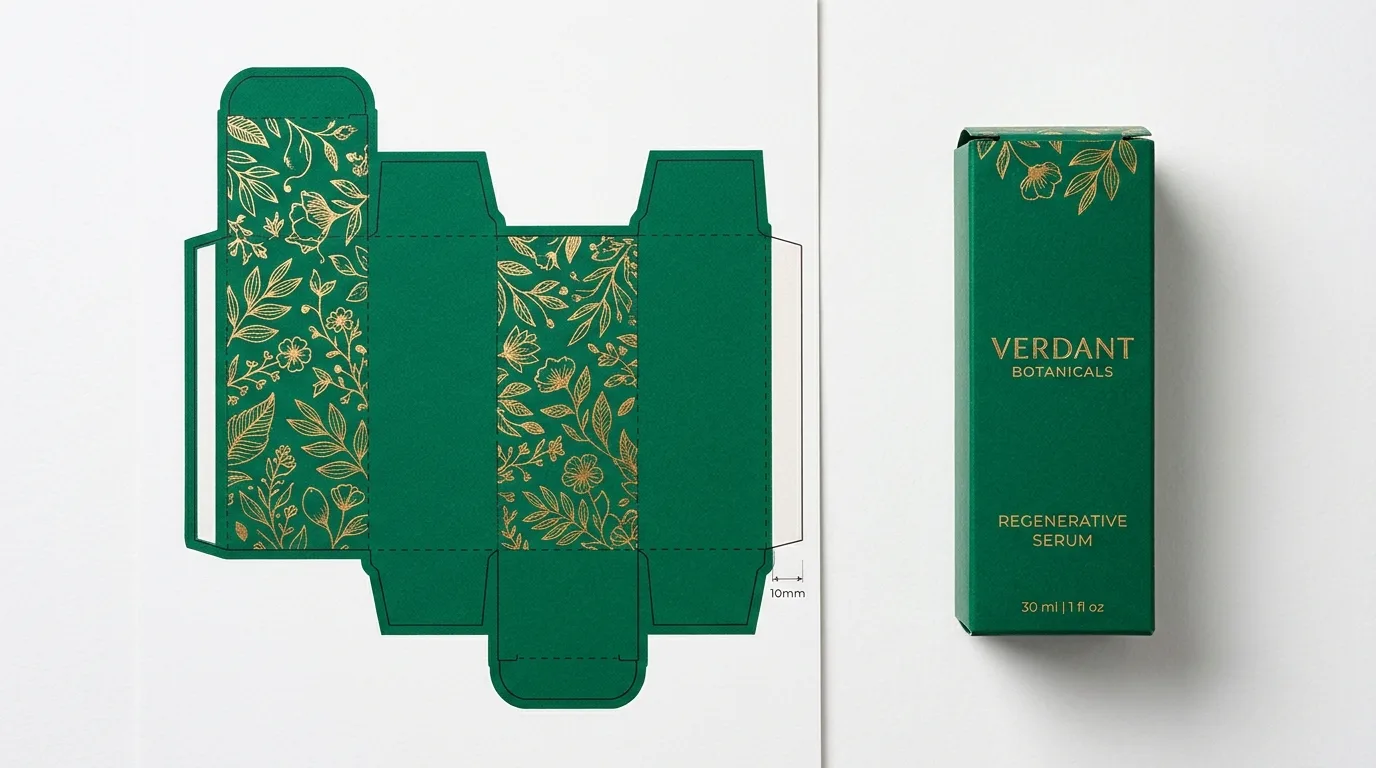 Flat reverse tuck end folding carton dieline showing emerald print bleed, fold creases, and glue tab beside the assembled box
When you open a generated dieline in Adobe Illustrator, Affinity Designer, or a CAD viewer, check for these standard line conventions and tolerances:
| Dieline Element | Standard Visual Convention | Typical Allowance or Spec | Production Purpose |
|---|---|---|---|
| Cut line (Trim line) | Solid vector stroke (magenta or red spot color) | 0 mm offset (exact outer perimeter and internal cutouts) | Guides the sharp steel rule on the cutting die or CNC blade that slices through the board |
| Crease / fold line | Dashed vector stroke (cyan or green spot color) | Offset by board caliper or flute thickness at double folds | Guides the rounded creasing rule that crushes board fibers along a hinge so the panel folds cleanly |
| Perforation line | Alternating dot-dash vector stroke | Cut-to-tie ratio matched to board weight (for example, 3 mm cut / 1.5 mm tie) | Creates tear-away zip strips on e-commerce mailers or retail display trays |
| Print bleed zone | Outer boundary line outside the cut perimeter | 3 mm (0.125 in) minimum past exterior cut lines; 5 mm (0.20 in) on heavy corrugated | Extends background ink past the knife edge so minor sheet shift never leaves an unprinted white edge |
| Safe zone (Inner margin) | Inner guide line inside every cut and fold line | 3 mm to 5 mm (0.125 in to 0.20 in) on cartons; 6 mm (0.25 in) on corrugated | Keeps logos, ingredient text, regulatory copy, and barcodes away from creases and knife edges |
| Glue tab / maker's joint | Hatched or labeled side flap | 12 mm to 18 mm (0.50 in to 0.70 in) on cartons; 30 mm to 38 mm on shipping cases | Provides an unvarnished, ink-free bonding surface where folder-gluer machines apply adhesive |
Two details often catch teams who build boxes in general graphic design software:
Packaging buyers and designers choose between four ways to generate a dieline depending on whether they are sizing a standard box, drafting brand artwork, or engineering a custom insert for a fragile product.
| Approach | How It Generates the Dieline | Output Formats | Best Used When | Key Limitation |
|---|---|---|---|---|
| Free browser dieline template generator (Cubit's dieline templates) | Parametric math builds a 1:1 flat vector layout from your inside Length x Width x Depth | Layered SVG (convertible to PDF or AI) | You need a starter template for a standard mailer, folding carton, shipping box, sleeve, or label to lay out artwork in Illustrator | Uses standard board thickness defaults; final fold allowances are confirmed for your exact flute or caliper at quoting |
| AI packaging design studio + structural team (Cubit Design Studio) | Chat brief + AI drafts artwork on a real dieline with a 3D preview; a Cubit designer and structural team finalize the production file | Interactive 3D preview, annotated revisions, and press-ready production dieline | You want to move from brief to visual mockup, dieline layout, human design polish, and a manufacturing quote in one screen | Studio access is by request rather than anonymous download |
| Professional structural CAD software (Esko ArtiosCAD) | Dedicated 2D/3D structural engineering libraries built on FEFCO and ECMA standards with board-caliper rules | ARD, DXF, CFF2, layered PDF, 3D Collada/OBJ | A structural packaging engineer is building multi-piece displays, die-cut partitions, or rotary die tooling | Requires specialized CAD training and commercial software licensing |
| Manual drawing in Adobe Illustrator | Designer draws rectangles, flaps, and tabs by hand with vector shape tools | AI, PDF, EPS, SVG | Making minor graphic edits to an existing manufacturer-supplied dieline | High risk of geometry errors on tuck ears, dust-flap clearances, and double-wall roll-over allowances |
For most consumer brands, combining a parametric starter template with manufacturer verification gives the most reliable path to press. You avoid drawing geometry by hand in Illustrator, and you still get structural sign-off from engineers working in CAD before steel dies are ordered. To see how AI fits into the broader artwork workflow, read our complete guide to AI packaging design.
Standardized box constructions follow global numbering systems so brands and converters speak the same language. Corrugated styles use the FEFCO Code, developed by the European Federation of Corrugated Board Manufacturers in the late 1960s and adopted worldwide by the International Corrugated Case Association (ICCA). Folding paperboard cartons follow the European Carton Makers Association (ECMA) code catalog.
Six structural styles cover most retail and e-commerce packaging runs:
The roll-end tuck-front mailer is the standard box for direct-to-consumer e-commerce and subscription orders. Cut from a single sheet of E-flute (about 1.5 mm thick) or B-flute (about 3.0 mm thick) corrugated board, it assembles without glue or tape. The side walls fold over twice to lock tabs into slots in the bottom base, while a hinged lid closes with dust flaps and friction ears (cherry locks) that tuck into the front double wall. Because those side walls roll over two layers of corrugated flute, the dieline generator adds extra width between the double fold creases so the lid does not bind. Download a custom-sized template on our mailer box dieline template page.
Cosmetics bottles, supplement jars, tinctures, and packaged foods typically use single-wall paperboard folding cartons (16 pt to 24 pt SBS or kraft board, roughly 0.40 mm to 0.60 mm thick) sealed along a vertical side glue flap:
Generate custom dimensions for paperboard cartons on our folding carton dieline template page.
When a folding carton holds a heavy glass candle jar or beverage bottle, a friction-tuck bottom can push open under weight. An auto-lock bottom dieline replaces the bottom tuck flap with four interlocking bottom flaps, two of which are pre-glued along diagonal fold lines during converting so the base snaps into a locked floor when popped open.
The FEFCO 0201 Regular Slotted Container (RSC) is the standard master shipping carton. All four top and bottom flaps share the same length (half the width of the box), so the outer lengthwise flaps meet at the center seam for taping. Crease offsets on a FEFCO 0201 dieline depend on whether you specify single-wall B-flute, C-flute (about 4.0 mm), or double-wall BC-flute corrugated board. Build custom shipping dimensions on our shipping box dieline template page.
A box sleeve wraps around a rigid setup box or tray using four main panels plus one bottom overlap glue flap, adding 0.5 mm to 1.5 mm of slip clearance so the sleeve slides smoothly. For flexible packaging, a stand-up pouch (doypack) dieline maps the front panel, back panel, bottom W-gusset, 5 mm to 8 mm heat-seal perimeter, tear notches, and zipper track.
Follow these six steps to go from a physical product on your desk to a verified, press-ready packaging dieline:
Watch out for these five mechanical errors before sending packaging artwork to prepress:
A starter dieline template is a parametric 2D vector outline generated from your inside length, width, and depth so you can lay out artwork, test panel proportions, and build 3D mockups. A production dieline is the final CAD file verified by a structural engineer for the exact caliper, grain direction, flute profile, and die-cutting press tolerances of the facility running your order. At Cubit Packaging, you can download free starter templates anytime, and our structural team confirms the production dieline with your quote before printing.
Commercial packaging converters require true vector formats where paths are defined mathematically at 1:1 scale: PDF (specifically layered PDF/X-4), Adobe Illustrator (.AI), SVG, or CAD exchange formats such as DXF and ArtiosCAD (.ARD). Raster formats like PNG, JPG, or flattened TIFF cannot drive a CNC sample table or laser die-board cutter and will cause jagged edges on text and cut lines.
Include at least 3 mm (0.125 inches) of bleed extending past every exterior cut line on folding cartons and E-flute mailers, and up to 5 mm (0.20 inches) on thicker corrugated shipping boxes. Keep all critical text, logos, regulatory statements, and barcodes inside a 3 mm to 5 mm safe zone away from every fold crease and cut line so mechanical cutting tolerances never clip your graphics.
Always enter inside dimensions in the order of Length x Width x Depth (L x W x D). Packaging is engineered from the inside out so your product and any protective insert fit the interior cavity properly; the generator and structural team add the extra board allowance needed for the outside walls and fold creases.
General AI image generators such as Midjourney or DALL-E create flat pictures of boxes, not scaled vector templates with separate cut, crease, and bleed layers. Purpose-built packaging tools pair parametric vector dieline geometry with AI artwork placement on each panel, followed by a human structural and prepress review to confirm glue-tab knockouts, CMYK color separations, and board-caliper tolerances before manufacturing.
If you already know your box style and inside dimensions, open Cubit's free dieline template generator to download a layered SVG for a mailer box, folding carton, shipping box, sleeve, or label with no account required, or use the pouch dieline generator for flexible bags. When you are ready to turn your dieline and artwork into physical boxes with a confirmed production proof, request a custom packaging quote and our team will price your quantity alongside up to three larger runs.
Design your packaging free in 60s
Try the free AI packaging design toolNeed Custom Packaging?
Get a free quote with pricing, MOQs, and turnaround time for your custom packaging project.